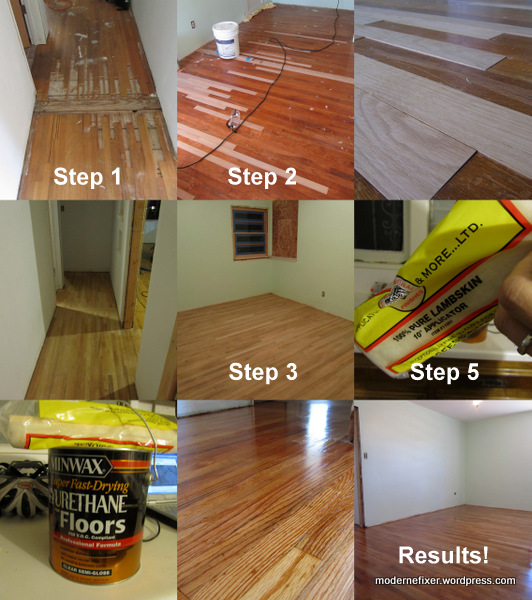
Well, he’s done it. Isaiah has taken the huge task of repairing termite damage and making the wooden floors in the baby’s room and hallway look as good as new. Now, of course, he is an amateur, so the result is not the same as what we would get had we paid thousands to a professional, but we don’t have thousands. We had a few hundred dollars to spend on this project and we made it work. (As soon as the wood floors in the living room and foyer undergo the same transformation, I’ll write a post that details final costs for this project.)
So how’d he do it?
1. He used a circular saw, drill, hammer and chisels to remove the tongue and groove strips with visible damage. (I say visible because after some sanding, Isaiah noticed that some other strips had damage that was below the surface.) Along the length of the damaged pieces, he cut the center of each strip, popped it out and then removed the sides.
2. Next, he measured and cut new strips to fit in place of the damaged ones. Since the groove in each strip has a top and bottom piece (in which the “tongue” fits), he had to cut off the bottom piece of the groove in order to slip each individual strip into place. He used a high-strength construction adhesive to secure each strip.
3. Then, with a belt sander and 60 grit sandpaper, he sanded the new strips down to the same level as the original strips. After which he sanded the whole room to remove the old polyurethane from the original strips. The perimeter of the room proved to be more difficult with the belt sander, so with an orbital sander and 60 grit sandpaper, he sanded down the edges and corners of the room. Using 120 grit sandpaper, he went over the whole room again with the orbital sander. All on his hands and knees, people. Sometimes doing handstands and howling at the moon.

4. He wiped down the walls, as dust had gone everywhere at that point! He also used a ShopVac to vacuum the whole room, several times. Using a lint-free cloth, he wiped the surface clean with mineral spirits and let dry completely.
5. Finally, using a lambskin sponge, he applied three layers of polyurethane to the floors, allowing 6-8 hours between each coat. He sanded a bit between the 2nd and 3rd coats.
So, lots of hard work, but a great end result. I’m so proud of him!!
P.S. Did I ever tell you how it was not very easy to find replacement strips to match the original strips? Well, we found a supplier in Santee that sells oak floor strips in a variety of sizes. We needed 2 in. white oak for the baby’s room and hallway (in stock) and 1.5 in. red oak for the living room and foyer, which the supplier special ordered for us.

Great job Isaiah. It does look like new.
Doesn’t it, Momma? Overall, I think it looks fantastic. Isaiah keeps noticing flaws but I tell him that no one is going to be looking at it with a magnifying glass 😉
I am loving the amount of detail and step by step photos on your blog.
thanks! It’s been quiet because we have a 4-week-old son, but there will certainly be more detailed posts in the future!
Oh my, 4 weeks! That would keep me off the internet for sure!
All the best with baby!